Showing posts with label WIP. Show all posts

Friday, November 23, 2018

Canadian Painting List?

As I mentioned in a previous post I've found myself quite energised about Team Yankee after FlamesCon 2018. One of the outcomes of this is a desire to paint an expansion pack for my Canadians. Right now I have a solid 100 point Force but looking through some of my options about how to expand it I found a wealth of options that I have previously discarded, but now with a little game time I find quite desirable.
So what's has me wanting to pull out the brushes?
Infantry
I really enjoyed how my single platoon performed in-game so adding a second platoon, and therefore a second Formation, is looking really good as a tactical choice. In fact a lot of my painting requirements stem from this. I have the Formation commander painted already, so this just means adding 4 M113s and the full strength infantry platoon.

SP Mortars and an OP
Adding a cheap battery of M125s are a no-brainer as far as I am concerned. They count for the Formation morale, have smoke, and best of all I have two painted already (for some unknown reason).

The OP is as much about the hobby opportunity as anything. I figured I guy either crouching on top of the M113, or high up in the commanders station with some maps on front of him would be fun.

TOW Launchers
The ADATS is great (with a capital G) but also quite expensive. An infantry Formation can pack a lot of M150 TOWs and they are fairly cheap, but quite lethal vs most enemy tanks. Plus I get to shoe horn a few more M113s into my army.

Leopard 2 tanks?
The Canadians didn't get Leopard 2s till fairly recently but that is not to say they wouldn't have acquired a platoon somehow during a hypothetical WWIII. If I painted 5 I could run them as an allied Formation....

Tornados
I have four F-18 Hornets at home assembled and ready to paint, along with some period correct (more or less) Canadian decals. Plus Hornets are cool.

More ADATS and Blowpipes?
Not on the list, but very tempted to fill out the platoons. After-all if I am going to paint this many things, what is another 5.

There you have it, I just want to paint another 35-40 things to round out the Army... hmm, lets hope my newfound energy lasts long enough to even build all this stuff!

Thursday, June 28, 2018

The Road To Panzerschreck (2016) The Marines Hit Early War

Originally this article was posted on the Flames Of War website back in 2016...

Next month is the annual Studio trip to Panzerschreck with the team jumping in a van and having an epic road trip / lads weekend away. This year I was planning on having a relaxed weekend and heading down to play some Team Yankee games with Evan. Thanks to a last-minute change of plans for Phil (James’ partner in crime for the event) I found myself subbed in to join up with James’ British Armoured Regiment.

No doubt you are all aware of the famous battle somewhere in North Africa where a small Marine Expeditionary Force briefly found themselves siding with a Vickers Mk IV light tank company…

Originally I was in two minds about what to take as I have a French Early War army that I really enjoy playing and need an excuse to finish painting up some Lorraine 38L Carriers. At the same time I have been plugging away with a US Marine Amphibian tank company for Gung-Ho and I saw this as an opportunity to push the army back to the front of the painting queue. After a couple of minutes thought the Marines (easily) found themselves promoted as it is hard to not go with something shiny and new, even if I do have to do a lot more painting to get it ready. Working out an army list that looked achievable on the painting front and fun to play I settled on: 

The core of the force is obviously the LVTs with 10 of them crawling across the table, hopefully shooting up everything in front of them. This should pair nicely with James’ Light Mk IV tanks which will be light enough to respond to any threats as well as threatening enemy objectives. If I am being honest the AA and Rockets are really there to get me to four platoons, but it will also give us some decent AA coverage (as James’ also has some Bofors guns) and rockets capable of thinning out the enemy ranks of infantry.


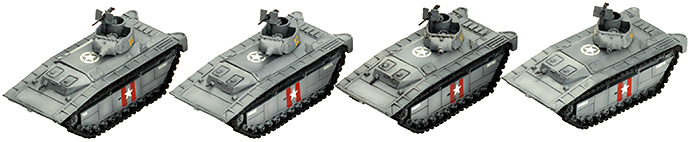
After the experiment with the dark sand (in the previous article) I decided to go back to pain grey vehicles and to make them look a little more interesting I decided to put beach markings on the sides of the hull (the two red vertical stripes you can see in the photos). These were to help the LVTs stick together and get to the correct landing zone – in this case Red Beach 2 during the Battle of Saipan. The theory being that you just followed the vehicles with the same markings as you. 

Next I chose to go to town on the decals and whilst I was inspired by historical markings here I chose to go a bit overboard to help them pop on the battlefield. I chose tank numbers from a spare NVA T-55 decal sheet I had, as well as US stars, serial numbers and names from the US Late War Decal Sheet (US941) I think these really help to make the models look interesting on the table.
As you can see from the pictures below I still have a way to go to finish the army up but with a couple of weeks to go I think I am in good shape.  

The HQ Platoon
I've only painted the 75mm turrets for my HQ, but I plan to paint up the 37mm ones later to make sure I can swap these around easily.  


LVT(A)4 (75mm) Platoon
Other than a targeted wash, these just need their crew painted and machine-guns highlighted.


Above: Most of the army are still waiting for a shading pin wash, so they are currently shiny with gloss varnish. I've used the number '13' 75mm tank to test the oil wash, and I'm happy with the finished result.

LVT(A)1 (37mm) Platoon
These are currently missing the machine-gun turrets, which will make them look a little more dynamic thanks to the crew sitting inside operating them.


Below: To do the red markings on the side of the hulls I made a mask using some low-tack hobby masking tape, then carefully attached it to a model, airbrushed the red and carefully removed it again. Rinse and repeat 32 times as I decided to do the markings on all my LVTs and not just the ones for Panzerschreck to keep everything consistent.


Hopefully this gives you some inspiration for painting your own LVTs.


Tuesday, June 19, 2018

Building a Marine Amphibian Tank Company


I’ve made no secret of my excitement about the Marine Amphibian Tank Company. And with Andrew making so much progress on his Ka-Mi tanks I thought I’d better get my act together and push ahead with my painting.

Luckily the LVTs are a breeze to assemble. With the hull and tracks being one piece, you are just gluing together the turrets and adding the optional hull machine-gun. A fairly relaxed afternoon saw them all assembled and undercoated.

The next problem was choosing what paint scheme I preferred. There are plenty of options and in the coming weeks I’ll have a short article talking about the most common options to choose from but in the end it came down to a grey or grey/sand scheme (like the Studio models) or a green/brown/sand scheme. The three colour scheme was just too similar to European paint schemes and nothing says the Pacific to me like tanks base coloured in grey!

Using my airbrush, I started by painting a light coat of grey over the whole model. This was to lay down a base colour for me to start highlighting up. I then applied a little more paint in certain areas such as the middle of large panels, the top surfaces, and anywhere else that I wanted a slightly lighter colour. Working over a black undercoat, I was able to use the grey as its own highlight by slightly varying the density of the paint coverage.

I decided that the grey alone was a little boring, so I thought I would try adding the common sand-coloured camouflage pattern to give the models a little more impact on the table. I also thought that the extra colour would mean that I did not have to do as much work to make the grey look good. So the next step was to cover the model in blu-tac.

In my paint collection at home, I didn’t have the Colours Of War Dry Dust or Crusader Sand that Aaron used when painting the studio models. So I improvised by grabbing a dark sand colour that I already had and sprayed it on. The blu-tac worked as planned, leaving me with nice hard edges between the grey and sand but I was not particularly happy with the colour as the studio models just looked better.

Looking at the images now as I write the article I find myself in two minds:
  • I quite like the plain grey, and it is a valid historical paint scheme, so I could just stick with that approach (saving me some painting time!);
  • Or I could “borrow” the studio paints for an evening and go with the grey/sand scheme.
I think will mull this over a little more and in the next few days make a final decision – the more I think about it, the longer it will take to finish them and get an army on the table. 


Saturday, April 1, 2017

Flames Of War V4 Launch Weekend

Over the Flames Of War V4 Launch Weekend I was pulling a little bit of double duty; hanging with most of the studio team assembling my DAK Panzers, whilst jumping back to the desk every now and then to web content. I thought it would be fun to shoot a little time lapse footage of what I was up to.

Saturday was a lot of fun and whilst it looks like I spent most of the day assembling Panzer III's, it wasn't as time consuming as it appears. 

Sunday was a bit of mess as the website decided to take a little break and all of our content dissapeared due to the quantity of content and massive amount of traffic generated by visitors coming by to check out the event.

The weekend was a blast and I now have (spoilers!) all of my Panzers and SP AT assembled for my Early/Mid War DAK tanks. Just need to get some recon and potentially aircraft or AA.

Hope you enjoy the video.


Wednesday, March 9, 2016

Tablescapes Urban Tiles: Base Coats

I've been struggling to do anything major over the past month or so but I've been able to chip away at my Secret Weapon Tablescapes Urban Tiles every now and then as I only needed to pop out to the garage to 5-10 minutes to spray a colour half dozen tiles. Over the course of a couple of weeks it mean that I have gone from Black Primer, to Dark Grey all over, to Medium Grey on the sidewalks and a light patchy dusting on the roads.

Next up is to paint the metal bits with a gunmetal colour and airbrush a lighter grey on each of the individual sidewalk tiles - that is going to be the really time consuming part. Once that is done I'll put some road markings on, must first experiment using a mask made from CCG cards worked badly so I will be picking up some low tac painters masking tape and trying again. After that I will mix up a few batches of oil washes - one brown, one black and one brown/black and apply liberally... at least that is the plan!


Cheap spray cans from my local Bunnings (NZ DIY store)
Laid out in my garage. Don't skimp on the newspaper surround. I have a large "overspray" of black and grey paint on the concrete now. Luckily its just the garage.
Sold coat of the dark grey spray on the tiles.
After the dark grey I used the plastic lid from an FFG Imperial Assault Carrier packaging to mask off the footpath and gutter whilst spraying the light grey on the sidewalks.
And I made a mask out of two old Battletech CCG cards and a lot of packing tape to help with the corners
And this is what 6 (out of the 32) tiles look like. Right now they all look like this (except 2 test ones) so I have a lot of airbrushing to do.
Each one of those tiles will need to be airbrushed using another card template. I've made one for the smaller "plaza" sidewalk tiles and I need to make a second one for the bigger sidewalk tiles.
And each square gets airbrushed from a different direction so that when a table is laid out the hightlighting of each individual sidewalk tile blends it all together.
Once it is all done, I still need to find some fairly generic 28mm buildings that I like to finish the whole thing off.


Sunday, February 21, 2016

Painting MERDC Camouflage

One of the things that really interested me when it came to painting a US force for Team Yankee was the opportunity to give them a really unqiue camo scheme - commonly known as MERDC (Mobility Equipment Research and Development Center).

The thing I found particularly interesting about this scheme is that the template is the same regardless of the theatre of its use, only the colours change. The benefit of this is that it makes it relatively easy to paint your vehicles in a historical scheme.

Of course, the downside is that all of your vehicles (of a type) need to look roughly the same. Realising this, I decided to take what many might consider the path of most resistance, coming up with some painting masks that would let me cut out either the Forest Green or Field Drab sections (I’m painting a force in the Winter Verdant MERDC variant, like the Battlefront studio US models pictured in the Team Yankee book) and airbrush that colour over a base of the other one.
 

The MERDC Templates
Before I could start making masks that I could use for airbrushing I needed to find out what colours are meant to go where. Aaron (the resident BF painter and font of knowledge) was kind enough to lend me his book on MERDC and some internet searches gave me a wide variety of material – thank goodness for the internet and large scale modellers! 


you can download a set of templates from the BF website here... (right click, save as...)

How did I make my masks?
I started out with the M113, because it met a couple of important criteria:

  • I needed a decent number of them, once you include a Mech Platoon, ITV Platoon, VADS Platoon and potentially Mortar Platoon in a force. 
  • It’s a box with tracks! The templates work much better on nice flat sides.
My first plan was to get some thin clear plastic sheet, overlay it on a print-out of the MERDC template, and cut out the appropriate bits. For the M113 I chose to cut out and spray the Field Drab, after initially basecoating the whole vehicle Forest Green. However, I found that in practice, clear rigid plastic was just too tough to cut precisely enough, even in very thin sheets. In our stationery cupboard I found some clear plastic document wallets made out of a nice soft plastic and therefore easy to cut. They were not very rigid, though, so I ended up building a frame out of some plastic card.

This worked really well, and the frame held the mask in place on the vehicle, making it easy to spray that face of the vehicle, quickly move the template to the the next one, spray and so on. Then I would grab the template for the next side and keep going. I did find that the front and rear faces had so much stuff on them that it was difficult to make a mask for them. So for these two faces I used blu-tack to make a mask instead.

Using this method I was able apply the Field Drab to six vehicles in about an hour, including blu-tacking the front and rear faces – not bad, compared to painting the pattern freehand!

Paper masks
I sent my original template to Evan (our sculptor) to try out. He took a simpler path, where he just printed out the template, cut out the Forest Green areas and then folded the paper over the vehicle. I had considered this approach, but my original concern was the durability of the paper versus plastic. I wanted my templates to be reusable over as many vehicles as might be needed.


But Evan's experience was that as he airbrushed the model, the dried paint actually helped to add rigidity to the mask. He found that with a couple of very small pieces of blu-tack were enough to hold the mask on to the model, leaving his hands free for easy airbrushing.

Cutting a paper version is definitely a lot faster. Whilst I have not yet tried it through to completion, I experimented with cutting one out for this M109, and it was pretty quick. As you can see, I have decided to combine the paper mask and blu-tack, as the majority of the surface is nice and flat.
Once again, I would blu-tack all the vehicles I planned to paint in one go, to help keep them looking the same. Plus, you do not want to be fiddling around with wet blu-tack and transferring paint everywhere.

Tips for using the masks
Commit to the process before finishing your assembly.
Certain items – cupolas, MGs etc – will get in the way and make it very difficult to lay the mask over the vehicle. So I would avoid or delay gluing them on to the vehicles if I was going to use a mask. I still hadn't made up my mind about using masks when I assembled my first vehicles, and now my M106 Mortar Carriers are going to present a challenge, as they have their baseplates and cupolas attached.

Print twice, cut once.
Planning is your friend. Before basecoating the vehicles, take a close look at the templates and work out what sequence of colours will work best. For the M113s the Field Drab areas seemed like the best choice to cut out, whereas for the M109s the Forest Green seemed like the best choice to cut out, avoiding a mask consisting of four or five tiny pieces. Decide on the sequence that will work best for you. But definitely try cutting some masks out first before you deploy the paint. It is also worth having a second, intact template printed, to guide you with painting the Sand and Black areas later on.

Always make sure you leave a frame around your masks (i.e. make the masks bigger than just the painted area) this way you wont get overspray on the other faces of the vehicle.
 

Paper or plastic?
They both have pros and cons. My plastic templates will last forever, but cutting them out did take a lot of time and effort: two or three evenings of thinking, planning, as well as some trial and error. With the benefit of practice, I am confident I could now do a set for another vehicle type in an evening. Paper is less durable, but much easier to work with. Cutting a set of masks for the M109 out of paper only took me about an hour, once I had decided how to sequence the colours.

Blu-tack is your friend.

If you decide to use paper masks, use blu-tack to help stick them down, so they don’t blow off with the air flow from the airbrush or let too much paint overspray underneath. You can also use it to mask fiddly areas where a paper or plastic mask is too much trouble – in which case, don’t forget to blu-tack all of your vehicles in one go, to save time and to make it easier to keep all of your vehicles looking consistent.
 

Take the pressure down.  
I turned my compressor down quite low to avoid the mask flying off or, in the cases where there was equipment making the mast sit above the vehicle, reduce overspray making its way under the edges of the template.

Masks won’t do everything.
There are just some areas where the masks won’t work – like the rounded corners of the M109 turret. My plan is the mask the top of the hull and turret, and side of the hull, then use blu-tack for the rest.

If you put the turret on hull (once painted) you can blu-tack the turret sides and use the turret top and hull side to help make sure your colours start and end in the right places.

And of course, once your templates have done most of the work, you can always use good old-fashioned freehand painting (airbrush or brush) to fix up any messy or incomplete areas.


What's next?
Finally, paint the Sand and Black strips on and you are done, ready for weathering, washes or whatever else you want to do. 

Hopefully this has given you some inspiration to at least try experimenting with the masks. I am certainly sold on the idea for vehicles where I think I will be painting a decent number of them, as the time invested up front pays dividends later. Especially since I now have plans to paint some New Zealand M113s in the Red Desert scheme!

Saturday, April 25, 2015

Comets Coming Together

With April coming to a close it has actually been a pretty busy month despite what the blog might suggest. I've been playing some X-Wing, checking out a pretty awesome new Auckland store, chatting to Ben from Breakthrough Assault (a lot) and chipping away at 11th Armoured Division.

Currently I am still in the assembly phase and I was really struggling with the new Comet plastics to get a rhythm going and then something suddenly clicked at our regular Thursday night work hobby evening... I just assembly lined up my last five Comets and (doing 5 vehicles at once)
  1. clipped off the lower hull, upper hull and hull rear plate and glued together
  2. clipped off turret top, bottom, bin, mantlet, then glued together
  3. clipped of hatch, light and gun and glued
  4. turret pins clipped and glued
  5. hull plated clipped and glued
  6. machine-gun section of the frame removed from the rest, clipped and glued
  7. last but not least, tracks clipped out but not glued! Going to be painting them separately and attaching at the end!
It took me more than an hour, but less than two and I was pretty happy about that effort given two tanks a couple of weeks earlier took me about the same amount of time. I did learn though that a pair of really fine clippers is a must for some of those finer parts. I'd been using my large GF9 clippers and they are just too big and unfortunately I'd left my smaller ones at home. Luckily I borrowed Aaron's Tamiya ones and they worked a charm.

With the 10 Comets now all assembled, it is time to hit the M5 halftracks and Universal Carriers. I have a bit of a deadline to hit though as our offices are going to be moving in about a month and the new place doesn't have quite the space for airbrushing that we have now and I'd like to break the back of this army (and my Panzerschreck one) before the move...

Good luck achieving that I say!

http://en.wikipedia.org/wiki/Anzac_Day


Thursday, May 29, 2014

Pushing ahead with my Dust SSU

It has been a very busy month on the hobby front with lots of things pulling me in multiple directions and as usual not getting much finished. Last week though I managed to get the base coats airbrushed on my Steel Guard HQ squad and Matrioshka.

I gave the models a quick clean up to get rid of the worst of the mould lines, then airbrushed them Tamiya Red Brown, with a directional spray of a 50/50 Red Brown and Dark Yellow mix. In some respects the results are a little subtle but I think they look quite good. If nothing else they help to make the real life lighting effects come out a little more.


I love the different backpacks for the HQ squad. Tossing around ideas on how to make it obvious which model is which. Currently thinking that the Officer (middle) will have a dark grey backpack, Mechanic (left) will have light grey, and the Medic a white backpack with a red cross.
The photos make the modulation appear quite subtle but I think in person they make quite a difference, especially on the armour panels on the side of the ams.


Next job will be to a little bit of detail work, then varnish and pin wash the models. However I have a few other tasks that need to take priority including getting my Jagdtigers ready for Panzerschreck as well as a little painting for a work project so I am not sure how long they will sit in this state....

Wednesday, May 21, 2014

2014 Painting Plans: Thinking about the Rhulic

Later this year a group of us will be heading down to Hamilton for the Annual Warmahordes Teams Tournament. We have put in some solid performances over the past few years, winning a couple of match-ups to keep us off the bottom of the table!

This year we thought we might try to theme our lists, each taking a different Rhulic caster and going for theme rather than substance. I am leaning towards taking Gorton as he is painted and I'm keen for any options to reduce my painting load..

I haven't really fleshed out the rest of the list yet, other than wanting to fit in a Ghordson Earthbreaker and (assuming I can convince my fellow Rhulic partners) Thor Steinhammer.

In preparation though I have begun assembling all of my remaining Rhulic models to I can pick and choose. The plan is to get everything built, based, undercoated and primed - that way I can start play testing a little later in the year and slowly finalise my plans.


Earthbreaker assembled and ready for action. A little tip: paint it in parts before doing your final assembly. I've made a 'Colossal' mistake fully assembling it as it is going to be hard getting into some spots
 
The rest of the assembled Rhulic boys. I have second units of High Shields and Forge Guard, as well as a Artillery Corps and Tactical Arcanist Corp still to put together.
 
 
I am currently thinking of a list that has an Earthbreaker, Thor, a couple of units of Forge Guard and maybe Brun Cragback & Lug. My intent is to begin painting some time after Panzerschreck (which is in July) depending on what other commitments come across my painting table.