
Last year I picked up a Canon 650D DSLR so that I could take some nice shots of my son instead of relying on my the camera in my phone or a point and click digital. I also wanted to be able to get some nice "first" videos (another reason to get the DSLR). Playing around with the camera at a few gaming events and at home I realised very quickly that going from a point and click to a DSLR is a reasonably big step, and then moving up from using the preset functions to manual mode is a huge step, so I decided to head out for half a day and take a practical "Photography Basics" course aimed at people who had just bought their first DSLR and wanted to get more out of it.
The course took a look at the three basic functions you need to get to grips with if you want to use your camera in manual mode where you control how you take photos, rather than letting the camera decide.
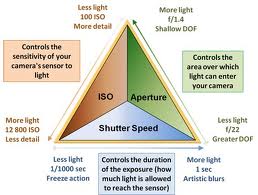 1. ISO - basically the sensitivity to light (one of my photography memories as a child back in the '80s is going to the pharmacy and watching my mum or dad buying film, deciding on the ISO rating they should chose - my dad was a very keen photographer).
2. Aperture (or F Stop) - this determines the depth of field, small number means that only the thing you are focused on is in focus, big number means that more things are in focus, so for table shots at a gaming convention you need to use the larger aperture.
3. Shutter Speed - faster means less blurring (so if you want to take a photo of a moving baby or water flying through the air) whereas slower can give you a nice blurring effect but you should invest in a tripod. Great for fireworks or Christmas lights.
 The other thing you need to take into account is that as you change these three settings you change the amount of light coming in, so you need to balance the three depending on what effect you want, and what the light conditions are - this was something I had real issues with during the day.
The class was fantastic, I managed to get my head around a few basic concepts that I was struggling with (despite the camera coming with an outstanding manual) as well as getting a better understanding to help me dive into a few of the photography websites out there and not feel completely out of my depth. The next trick is to go out and actually take a few photos and try to bed down this new info before my internal reset button kicks in and I forget everything (normally this happens somewhere between Saturday morning and Sunday night). The other benefit was that I managed to take a few nice photos, none of which were of little toy soldiers for once!
 |
| Flowers and plants in Albert Park |
 |
| Some more flowers... |
 |
| And this time plants. |
 |
| Did anyone tell the juggler? |
 |
| Park bench - nice drybrushing! |
 |
| Moss growing... |
 |
| No moss growing on these trees |
 |
| Fountain/skylight in the Britomart Train Station... |
 |
| that I walk under most days on the way to work... |
 |
| And have always wanted to stop under and stare through. |
 |
| Class photo. |
1 comment:
Really nice pics there :)
I've been meaning to take photo lessons to but have just been busy.
Post a Comment